
There's nothing more "homey" or "comforting" than Homemade Egg Noodles. These thick and tender noodles will take you back to grandma's kitchen. I was intimated for the longest time before I realized how simple they are to make. Homemade Egg Noodles will elevate any soup, stew, or stroganoff recipe to a whole new cooking level.

Why I love these Homemade Egg Noodles Recipe:
There is no expensive pasta machine or equipment needed. It takes a little more time and effort but you can get amazing results from just a rolling pin and a pizza cutter. I like a more rugged and rustic noodle. They have a great deal of character because they're not perfectly shaped.
This recipe has only 5 ingredients and all of these would probably be in your kitchen. Homemade Egg Noodles are very inexpensive to make with ingredients you have on hand. They're a very economical way to cook. Add these noodles to my Homemade Chicken and Noodles and Roasted Garlic Mashed Potatoes recipes and you could easily feed 10-12 people easily.
Homemade Egg Noodles are a great make ahead recipe that freezes wonderfully. Why not roll out a double batch and load up extra in your freezer to throw in a last-minute soup idea.
Adding these Homemade Noodles to any soup or stroganoff recipe makes for a hearty and satisfying dish. You cannot compare these to a cellophane packaged noodle from the grocery store shelf. They give a much more gratifying and cozy food experience because they're so filling.

Step by Step Instructions on Making Homemade Egg Noodles:
#1 Make a well in the center of the dry ingredients.
Whisk together the flour, salt and baking powder in a medium-size mixing bowl. The best way to incorporate these dry ingredients into the wet ingredients is to make a well in that flour mixture.
#2 Draw the dry ingredients into the liquid by working outward from the center with a gentle circular motion.
Pour the milk, and crack the eggs into the well. Start with ½ cup of milk and add additional milk as needed if the dough is too dry. With a wooden spoon and a gentle circular motion begin drawing the flour into the milk and eggs. Work from the center and make your way outward until all the flour is absorbed into the liquid. This way of mixing gives better absorption for the dough and does not damage the gluten.
If you're working on a surface such as a large cutting board or your countertop, you basically work the same method as above. This eliminates the need for a bowl and makes cleanup much easier. The well keeps the liquids from running all over the counter as well.
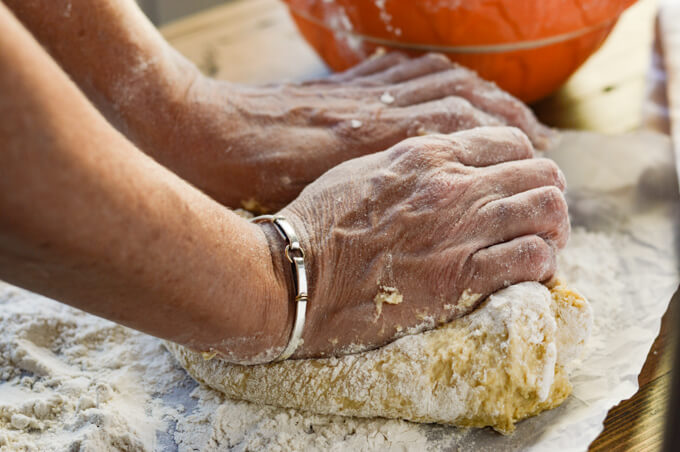 #3 Knead the dough for 5-10 minutes.
The dough at this stage will be somewhat sticky and messy. Turn it out onto a lightly floured surface, such as a large cutting board or your countertop. Sprinkle a little flour on the dough as you begin the kneading process.
Make sure your hands are well floured. Using your palms, push down on the dough and away from you. Flip it in half back toward you, and turn it a quarter of a turn. Begin the process again, pushing down and away. Flip and turn. Sprinkle more flour as needed during this kneading process.
Continue kneading in the above fashion until it is no longer sticky and has a pliable, smooth texture almost like a firm ball of play dough. It should have elasticity and springiness to it as well. I'm not going to lie too you, this process takes some time and effort, anywhere from 5-10 minutes with a lot of elbow grease. It's hard to over-knead, as it will eventually have too much elasticity and will not allow you to continue.

#4 Resting the dough helps relax the dough.
Give the dough time to rest by wrapping it in plastic wrap and setting it aside for 30 minutes. This process helps the dough relax creating the rollout to be easier. Otherwise, the dough will have a tendency to seize up and spring back. When the dough is relaxed it yields to you rather than against you which makes your job much more pleasant.

#5 Rolling out the dough.
Unwrap the dough and divide it into two equal balls. Wrap the second ball back up so it does not dry out while you are working with the first one. Using plenty of flour on your surface, place the dough and press down with your hands. Sprinkle additional flour on the dough and on your rolling pin. From the center of the ball begin rolling out in every direction adding more flour as needed. Flip the dough over and continue rolling until you have the desired thickness, somewhere between ⅛-1/4 of an inch. The thinner you make them, the quicker they will cook.

#6 Cutting the dough into strips.
You really don't need a fancy tool to cut the noodles. You can use a sharp knife or a pizza cutter like I used. At this stage, it's all personal preference as to whether you like wide noodles or narrow ones. I really love the rugged, rustic feel of noodles that are not cut perfectly. It just adds to the authenticity of them being homemade.
#7 Drying and storing the noodles.
You could add the noodles to a boiling pot of broth immediately, or let them dry out, probably about 30 minutes. My mom always just left them in the flour on the counter and spread them out, which has been my "modus operandi" when making egg noodles as well. You could hang them over a drying rack or lay them out on wire baking racks.
If you want to store the noodles, let them dry out completely (2-3 hours) and place them in an airtight storage bag or container. According to the spruce Eats the egg noodles will stay at room temperature up to a month. If you want to freeze them, make sure again you let them completely dry out before you place them in a freezer container or ziplock bag. They will stay in the freezer for up to 8 months.

#8 Cooking Homemade Egg Noodles
The length of time to cook these all depend on how thick or thin you have made them. If they are thin the cooking time is much faster. I roll mine out a little thicker and usually cook them right away. It takes about 10 minutes for them to achieve an al dente stage.
If the noodles are too thick you end up cooking them longer. The problem with overcooking is that the noodles can become mushy on the outside while still uncooked on the inside. As you play with the cooking process, you will become more in tune with how thick your noodles should be and how long you should cook them.

These noodles have been in my family repertoire of recipes for as long as I can remember. I grew up with these noodles in my mom's Homemade Chicken and Noodle recipe. And if you don't mind me saying, this is the best Chicken and Noodle recipe EVER. It's thick and rich and hearty. The sauce alone is magnificent because the chicken is cooked in a vegetable stock with onions, garlic, celery, and carrots to give it the greatest amount flavor.
Another great recipe that you might want to add these noodles to is my Beef Stroganoff Flambé.
PrintEasy Homemade Egg Noodles

There's nothing more "homey" or "comforting" than Homemade Egg Noodles. These thick and tender noodles will take you back to grandma's kitchen. I was intimated for the longest time before I realized how simple they are to make.
- Prep Time: 20 minutes
- Cook Time: 10 minutes
- Total Time: 30 minutes (not including resting or drying time)
- Yield: 8 servings 1x
- Category: Pasta
- Method: Stovetop
- Cuisine: American
Ingredients
- 3 cups All-Purpose Flour
- 2 teaspoons Kosher Salt
- 2 teaspoon Baking Powder
- 5 large Eggs
- ½ – ¾ cup Milk
Instructions
- Combine the dry ingredients in a medium-size mixing bowl and whisk together.
- Make a well in the center of the flour mixture. Pour the milk, and crack the eggs into the well. Start with ½ cup of milk and add additional as needed.
- With a wooden spoon and a gentle circular motion begin drawing the flour into the milk and eggs. Work from the center and make your way outward until all the flour is absorbed into the liquid.
- Turn the dough onto a floured surface and knead for 5-10 minutes adding more flour as needed.
- Wrap in plastic wrap and let it rest for about 30 minutes. Divide into 2 equal balls to make rolling it out easier.
- Add more flour to your surface, work with one ball at a time, and roll out the dough to your desired thickness. I recommend ⅛-1/4 inch thick. Use additional flour as needed to prevent the dough from sticking.
- Use a pizza cutter and cut strips. Add more flour as you separate the noodles. Set them aside and repeat with the other ball of dough. Lay the noodles out on the counter with the flour to sit for about 30 minutes. Or you can cook them immediately.
- Add them to a large pot of boiling vegetable stock or water with a tablespoon of salt and cook until they are al dente. The length of time depends on how thick or thin the noodles are.
Notes
- How to knead the dough - using your palms, push down on the dough and away from you. Flip it in half back toward you, and turn it a quarter of a turn. Begin the process again, pushing down and away. Flip and turn. Sprinkle more flour as needed during this kneading process.
- Continue kneading in the above fashion until it is no longer sticky and has a pliable, smooth texture almost like a firm ball of play dough. It should have elasticity and springiness to it as well. It will take anywhere from 5-10 minutes of kneading.
- Give the dough time to rest by wrapping it in plastic wrap and setting it aside for 30 minutes. This process helps the dough relax creating the rollout to be easier.
- Using plenty of flour on your surface when rolling it out, place the dough and press down with your hands. Sprinkle additional flour on the dough and on your rolling pin. From the center of the ball begin rolling out in every direction adding more flour as needed.
- You really don't need a fancy tool to cut the noodles. You can use a sharp knife or a pizza cutter. It is all personal preference as to whether you like wide noodles or narrow ones.
- You could add the noodles to a boiling pot of broth immediately, or let them dry out long enough so they won't stick together, probably about 30 minutes.
- If you want to store the noodles, let them dry out completely (2-3 hours) and place them in an airtight storage bag or container. The egg noodles will stay at room temperature up to a month. If you want to freeze them, make sure you let them completely dry out before you place them in a freezer container or ziplock bag. They will stay in the freezer for up to 8 months.
- The length of time to cook these all depend on how thick or thin you have made them. If they are thin the cooking time is much faster.
Nutrition
- Serving Size: ⅛ of recipe
- Calories: 219
- Sugar: 1 g
- Sodium: 347 mg
- Fat: 4 g
- Saturated Fat: 1 g
- Unsaturated Fat: 2 g
- Trans Fat: 0 g
- Carbohydrates: 34 g
- Fiber: 2 g
- Protein: 9 g
- Cholesterol: 118 mg


Billy says
Made these tonight. They turned out great! Didn’t know how long to cook the noodles. I ended up adding them to some beef broth then boiled them for a few minutes then put them down on low for about 35-40 mins.
Kristy Murray says
Thanks so much Billy for taking the time to share. I'm so happy that you enjoyed the noodles. The time for cooking the noodles varies concerning how thick they are when rolled out. And that's perfect that you cooked them in beef broth.
Julia Marple says
Looks exactly like our family's! ...but my grandma didn't use baking powder and do all that kneading. hmmm.
I was just checking to see if I could roll them out the day before, and your answer is "Yes!" Thanks.
Kristy Murray says
Thanks so much, Julia. So interesting about the baking powder and the kneading. I do love "family" recipes because they are tried and true. And every family has some variations. I so appreciate you sharing.
Valentina says
I just jumped over from your chicken noodles soup because the noodles in it looked too good to resist. I would find it almost as comforting to make these, along with the soup, as I would to eat them. 🙂 ~Valentina
Kristy Murray says
Thanks so much Valentina. It is such a comforting meal that is perfect for the cooler weather.
Karen says
I have used my Grandmothers recipe for years. Lost it due to moving. Found this and it looks so close to hers. Thank you so much. Makes enough for two meals for my family. Chicken noodle today for grandson who has fever and will be going to Dr this evening. It’s his favorite soup and loved my noodles.🥰