
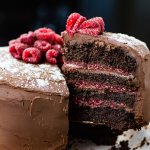
A deliciously rich and moist four-layered Chocolate Cake with Raspberry Filling is the perfect decadent dessert for any special occasion. Four layers of dark chocolate cake, creamy chocolate frosting, and a luscious raspberry filling. The entire cake is frosted with a silky ganache that envelops this gorgeous masterpiece. It is pure indulgence!

Don't be fooled by how complicated this layered cake appears. It can be a little intimidating when you look at all the ingredients and the steps but if you take it one step at a time you will realize the simplicity of it all. And when you finish you will feel as though you accomplished a true work of art. And if you want to try another fabulous dessert with fruit, my Cherry Cheesecake recipe is one of the best. Two of my favorite layered cakes for the holidays are Pumpkin Spice Cake with Cream Cheese Frosting and Gingerbread Cake with Cream Cheese Frosting. They are beyond irresistible.
How to Make this Chocolate Cake with Raspberry Filling
Step # 1 - Mixing Dry and Wet Ingredients
It's important to whisk together the dry ingredients and the wet ingredients separately. This helps to distribute the dry ingredients evenly throughout the batter.
Use two separate bowls. A medium-size one for the dry ingredients and a larger one for the wet. Once the dry ingredients are all whisked together fold them into the wet ingredients but only until they are combined. Meaning as soon you can no longer see the dry ingredients. Overmixing can result in a shorter cake and a more dense chewy one making it quite gummy.

Ingredients for the Chocolate Cake Batter
Dry Ingredients
- All-Purpose Flour
- Granulated Sugar
- Good Quality Cocoa
- Baking Soda and Baking Powder
- Salt
Wet Ingredients
- Eggs (room temperature)
- Buttermilk (room temperature)
- Cold Strong Coffee
- Canola Oil
- Vanilla

Step #2 - Preparing the Pans and Baking the Cakes
What you will need. Two 9-inch round pans, parchment paper, pen, scissors, and cooking spray (Pam).
- Using a pen or a marker, lay the bottom of your round pan on a sheet of parchment paper slightly bigger than your pan. Mark around the bottom of the pan on parchment paper. Cut the marked parchment paper with your scissors. Spray both the sides and bottom of the pan with the cooking spray and press the cut parchment paper in the bottom.
- Evenly fill the pans with the chocolate batter and bake in a 350°F oven for 40 to 45 minutes or until a toothpick inserted comes out clean. A few moist crumbs holding on to the toothpick is a good indicator that the cake is still moist and not over-baked.

Step # 3 - Making the Raspberry Filling
The raspberry filling is the highlight of this four-layer chocolate raspberry cake. It's a subtle fruity touch that enhances the flavor and makes the cake shine.
- Make a slurry of water, lemon juice, and cornstarch. Cook it along with granulated sugar until the sugar is dissolved and it begins to boil. Add the raspberries and cook the mixture over medium heat until the raspberries break down and the sauce begins to thicken. Lower the heat and cook at a slow boil for 15 minutes.
- Add a pinch of salt to the filling. This helps enhance the flavor of the fruit and balances the sweetness.
- This raspberry filling is best made ahead of time and given time to chill in the refrigerator. It can be made two weeks in advance if stored in an airtight container in the refrigerator.
- If fresh raspberries are not in season, you can easily substitute frozen berries.
Ingredients for the Raspberry Filling
- Water
- Fresh Lemon Juice
- Cornstarch
- Granulated Sugar
- Fresh Whole Raspberries
- Pinch of salt

Step # 4 - Slicing the Cake Layers
What you will need. A pairing knife to score, a long serrated knife to slice, and a turntable.
- Once the cakes have finished baking, let them sit for about 5 minutes in the pans but not longer than that or they will begin to sweat and create condensation. Take a butter knife and circle around the edge of each cake to loosen it.
- Remove the cakes from the pan by placing a cooling rack on top of each and inverting them onto the rack. If you find the cake is not loosening from the pan easily, tap it a few times on the bottom and gently lift the pan up. Pull off the parchment paper and discard.
- Make sure the cakes are completely cooled before slicing. A cooled cake is firmer and less likely to crumble or tear when cutting.
- The cakes can be made ahead of time. Once they are completely cooled, wrap them in plastic wrap and place them in a large plastic freezer bag. If you have cardboard cake rounds to place them on, it helps the cakes to lay flat. They will store in the refrigerator for up to three days and in the freezer for up to one month. To thaw from the freezer, pull them out and let them sit wrapped for several hours.
- A turntable works great for slicing the cakes. Use a paring knife and score the cake halfway up the sides and all the way around. This will act as a guide when you actually slice it.
- Place one hand on top of the cake. Use the serrated knife to slice through while turning the cake and follow the scoring line.

Step # 5 - Making the Frosting Filling
This frosting will be used between the layers of this Chocolate Raspberry Cake.
- Make sure the butter and cream cheese have set out to room temperature before beginning.
- Beat the cream cheese and butter together until they are fluffy. Add the confectioner's sugar along with the cocoa powder. Continue beating until they have incorporated into the cream cheese and butter mixture. Add the heavy cream and pure vanilla.
- Don't make this frosting too far in advance. If you do, cover it with plastic wrap and set it in the refrigerator. You will want to beat it again before frosting the layers so that it is soft and workable.
Ingredients for the Frosting Filling
- Cream Cheese
- Butter
- Confectioner's Sugar
- Cocoa Powder
- Heavy Cream
- Pure Vanilla

Step # 6 - Assembling the Layers
- Place the first layer, top-side down, on either a cardboard cake round or a cake stand. Tuck four strips of parchment paper under the cake to keep your stand or plate nice and clean. These will be pulled out from under the cake when everything is frosted.
- Start with the chocolate frosting filling. I like to use an offset spatula for frosting the cake. But a spatula or a butter knife will work as well. Spoon three or four dollops of frosting on the layer and spread it on the cake while creating a lip around the edge. This will serve as a barrier to the raspberry filling.

- Spoon the cooled and thicken raspberry filling on top and spread to the lip of the chocolate frosting.

- Continue two more times layering the cake, frosting, and raspberry filling ending with the rounded top layer.

Step # 8 - Making the Ganache
Ganache is a mixture of heavy cream and chocolate and is used with a variety of candies, cakes, and desserts. Depending on how much cream is used, the ganache ranges from a thin glaze to a thicker consistency. This recipe creates a hardened fudgy frosting once the cake is chilled.
- I recommend using a good-quality pure semi-sweet chocolate bar. Ghiradelli or Bakers are great brands.
- An important step in making the ganache is to chop the chocolate bars into really small pieces. This allows it to fully melt before the cream cools.
- Use heavy cream. Don't substitute half and half or milk for the cream. It will not end up setting properly.
- Heat the cream in a small saucepan over medium heat just until simmering. When you see tiny bubbles around the edge of the pan, pull it off the heat and immediately pour it over the chocolate.
- Let the cream and chocolate sit for one minute before mixing.
- Using a wooden spoon, gently stir the cream and chocolate together, adding light corn syrup to the mixture. Be careful not to stir too quickly which can incorporate air bubbles into the ganache.
- As the ganache sits and cools, it will thicken and have the correct consistency for frosting the cake. This can take anywhere from one to two hours. Be patient, it's so worth the wait.
Ingredients for the Ganache
- Pure Semi-Sweet Chocolate Bars (I like Ghiradelli or Bakers)
- Heavy Cream
- Light Corn Syrup

Step # 8 - Applying the Crumb Layer
What is a crumb layer? It is a thin layer of icing and is used as a base coat to seal in any crumbs before actually frosting the cake. This is one of the most important steps for a final clean appearance.
- Spoon several dollops of the ganache around the top edge of the cake. Using an offset spatula, apply the crumb layer by working your way down the cake while filling any gaps or uneven surfaces. Don't worry if you see any cake surface or even some of the raspberry filling.
- Chill the cake in the refrigerator for about 30 minutes.

Step # 9 - Frosting the Layered Chocolate Cake with Raspberry Filling
- Start with dollops of ganache frosting around the top of the cake. Use an offset spatula like the one shown below and spread the frosting around on top of the cake. Then slowly work your way down the sides turning the cake as you work.

Step # 10 - Garnishing the Layered Cake
This is the last step before you display a gorgeous and ridiculously enticing chocolate raspberry cake.
- Sprinkle powdered sugar over the top (optional) and highlight the cake with fresh whole raspberries. In order for the raspberries to stick to the top of the cake, I spooned a tiny amount of the ganache onto the bottom of the raspberries. This way they don't roll off the cake when you cut into it.

How long will this Cake last in the Refrigerator?
Cover this cake lightly with either plastic wrap or foil, store it in the refrigerator and it will still be moist for up to five days.

This beautiful Chocolate Cake with Raspberry Fillig will create a memorable occasion for Valentine's Day, a birthday celebration, Mother's Day, Easter, or whatever special moment you have coming up. I can pretty much guarantee it will be a showstopper on whatever table you set it on.

If you're looking for more dessert recipes, check these out:
Chocolate Peanut Butter Cupcakes with Resee's Surprise
Salted Caramel Layered Pumpkin Cake
Lemon Bars Infused with Lavender
Follow me on Pinterest - Linger.
PrintLayered Chocolate Raspberry Cake
A deliciously rich and moist four-layered Chocolate Raspberry Cake is the perfect decadent dessert for any special occasion coming up. Frosted with a fudgy, silky ganache that envelops this gorgeous masterpiece of sweetness.
- Prep Time: 1 hour
- Cook Time: 45 minutes
- Total Time: 1 hour 45 minutes
- Yield: 14-16 servings 1x
- Category: Baked Goods
- Method: Baked
- Cuisine: American
Ingredients
Chocolate Cake
- 2 ½ cups + 2 tablespoons All-Purpose Flour
- 3 cups granulated sugar
- 1 cup + 2 tablespoons Cocoa Powder
- 1 ½ teaspoon Baking Soda
- 1 ½ teaspoon Baking Powder
- 1 ½ teaspoon Salt
- 3 large Eggs
- 1 ½ cups Buttermilk
- 1 ½ cups Cold Strong Coffee
- ¾ cup Canola Oil
- 2 teaspoons Pure Vanilla
Raspberry Filling
- 4 teaspoons Water
- 1 ½ tablespoon Freshly Squeezed Lemon Juice
- 3 tablespoons Cornstarch
- ¾ cup Granulated Sugar
- 5 (about 24 ounces) cups Fresh or Frozen Raspberries, extra for garnishing
- A pinch of Salt
Chocolate Frosting Filling
- 8 ounces Cream Cheese, softened
- ½ cup Butter, softened
- 3 ½ cups Powdered Sugar
- ½ cup Cocoa Powder
- 2 tablespoons Heavy Cream
- 1 teaspoon Pure Vanilla
Chocolate Ganache
- 16 ounces Semi-Sweet Chocolate Bars, finely chopped (I prefer Ghirardelli or Bakers)
- 2 cups Heavy Cream
- 1 heaping tablespoon Light Corn Syrup
Instructions
Chocolate Cake
- Preheat the oven to 350°F.
- Prepare 2 - 9-inch round cake pans by laying each pan on a piece of parchment paper and trace around the bottom of the pan with a pen or marker. Using scissors, cut out the parchment paper circles. Spray both the bottom and the sides of each round pan with cooking spray (Pam Spray) and lay the parchment paper in the bottom.
- In a medium mixing bowl, whisk together 2 ½ cups + 2 tablespoons all-purpose flour, 3 cups granulated sugar, 1 cup + 2 tablespoons of cocoa powder, 1 ½ teaspoon each of baking soda, baking powder, and salt. Set aside.
- In a large mixing bowl, whisk 3 large eggs until fully beaten. Mix in 1 ½ cups buttermilk, 1 ½ cups cold strong coffee, ¾ cup canola oil, and 2 teaspoons pure vanilla.
- Fold the dry mixture into the wet one, only until combined. You will still see lumps in the batter.
- Pour the batter evenly into the cake pans.
- Place in the oven and bake for 40-45 minutes or until a toothpick inserted comes out clean. A few moist crumbs hanging on is the best indicator that the cake is still moist.
- Let the pan sit for 5 minutes. Using a butter knife, circle around the edge of the pan to loosen the cake.
- Place a cooling rack on top of the cake and invert it onto the rack. Tap a few times on the bottom and gently pull the pan off the cake itself. Remove the parchment paper and discard.
- Let Completely Cool.
Raspberry Filling
- In a small bowl, whisk together 4 teaspoons water, 1 ½ tablespoon lemon juice, and 3 tablespoons of cornstarch.
- Over medium heat, heat a small saucepan and add the cornstarch mixture. Add ¾ cup sugar and bring to a low boil, stirring constantly until the sugar is dissolved.
- Add 5 cups raspberries and increase the heat to medium-high. Bring the mixture to a boil, then reduce it back to a simmer. Simmer for about 15 minutes or until the mixture has fully thickened.
- Remove from the heat and let cool. Chill in the refrigerator.
Chocolate Frosting Filling
- In a large mixing bowl add 8 ounces softened cream cheese, ½ cup softened butter. Beat until fluffy.
- At a slow speed, beat in 3 ½ cups powdered sugar and ½ cup cocoa powder until fully incorporated into the cream cheese and butter.
- Add 2 tablespoons heavy cream and 1 teaspoon pure vanilla.
- Cover with plastic wrap and set aside.
Chocolate Ganache
- In a medium mixing bowl add 16 ounces of finely chopped semi-sweet chocolate bars.
- In a small saucepan, heat 2 cups of heavy cream over medium heat until the edges of the pan begin to slightly bubble.
- Remove from the heat and immediately pour over the chocolate.
- Let the cream and the chocolate sit for 1 minute.
- Gently stir and add 1 heaping tablespoon of light corn syrup.
- Set aside to cool for 1 to 2 hours or until it is thick enough to frost the cake. Stir every once in a while for the ganache to thicken evenly.
Combining all the Layers
- Using a turntable, score each completely cooled round cake about halfway up and all the way around.
- Place one hand on top of the cake and turn as you cut horizontally through the cake with a long serrated knife. Use the score marks to guide the cut.
- Place the first layer, top-side down, on either a cardboard cake round, a cake stand, or a plate. Tuck four strips of parchment paper under the cake to keep your stand or plate nice and clean. These will be pulled out from under the cake when everything is frosted.
- Spoon ⅓ of the chocolate frosting filling as dollops on top of the first layer. Using an offset spatula, spread the frosting around the top while creating a lip around the edge to hold in the raspberry filling.
- Next, spoon ⅓ of the raspberry filling over the chocolate frosting filling and spread to the lip of the frosting.
- Continue layering as above 2 more times. The frosting and the raspberry filling tend to cause the cake layers to slip and slide a bit. Continually adjust the layers as you go.
- Top with the last rounded top cake layer.
Create a Crumb Layer
- Using some of the ganache, spread a thin layer on both the top and sides of the layered cake filling in any gaps.
- Chill in the refrigerator for about 30 minutes until the ganache is hardened.
Frosting and Garnishing the Chocolate Raspberry Cake
- Spoon several dollops of the cooled and thickened ganache on top of the cake. Using an offset spatula begin spreading it around on both the top and sides. Continue spooning more frosting as needed to cover the entire cake.
- Sprinkle powdered sugar over the top (optional).
- Garnish the top of the cake with fresh whole raspberries. To help them stay in place, dab a little bit of ganache on the bottom of the raspberries and arrange in the center of the cake.
ENJOY!!
Notes
- It's important to whisk together the dry ingredients and the wet ingredients separately. This helps to distribute the dry ingredients evenly throughout the batter.
- Overmixing the cake batter can result in a shorter cake and a more dense chewy one making it quite gummy.
- This raspberry filling is best made ahead of time and given time to chill in the refrigerator. It can be made two weeks in advance if stored in an airtight container in the refrigerator.
- If fresh raspberries are not in season, you can easily substitute frozen berries.
- Make sure the cakes are completely cooled before slicing. A cooled cake is firmer and less likely to crumble or tear when cutting.
- The cakes can be made ahead of time. Once they are completely cooled, wrap them in plastic wrap and place them in a large plastic freezer bag. If you have cardboard cake rounds to place them on, it helps the cakes to lay flat. They will store in the refrigerator for up to three days and in the freezer for up to one month. To thaw from the freezer, pull them out and let them sit wrapped for several hours.
- Don't make this chocolate frosting filling too far in advance. If you do, cover it with plastic wrap and set it in the refrigerator. You will want to beat it again before frosting the layers so that it is soft and workable.
- Tuck four strips of parchment paper under the cake before layering and frosting to keep your stand or plate nice and clean. These will be pulled out from under the cake after it is frosted.
- An important step in making the ganache is to chop the chocolate bars into really small pieces. This allows it to fully melt before the cream cools.
- Use heavy cream. Don't substitute half and half or milk for the cream. It will not end up setting properly.
Nutrition
- Serving Size: 1 Slice
- Calories: 814
- Sugar: 88 g
- Sodium: 440 mg
- Fat: 36 g
- Saturated Fat: 16 g
- Unsaturated Fat: 9 g
- Trans Fat: 0 g
- Carbohydrates: 116 g
- Fiber: 8 g
- Protein: 7 g
- Cholesterol: 68 mg


Sharon Rigsby says
Oh my goodness, I could dive into all of that deliciousness! What a beautiful cake and just in time for Valentine’s Day too!
Kristy Murray says
Awww thanks, Sharon. It really is a ridiculously delicious but dangerous cake to have around. I couldn't stop eating it. LOL.
Carrie Tyler says
Oh, wow! Talk about decadent and delicious! This is such a moist chocolate cake! What a treat and perfect for Valentines Day - or any day! I cannot wait to try this!!
Kristy Murray says
Thanks Carrie. Hope you enjoy!
Katerina says
Chocolate and raspberry is such a great combination, Kristy! And that icing, oh my goodness - what a perfect dessert for Valentine's Day!
Kristy Murray says
Thanks so much Katerina. It is ridiculously decadent.
FREDDIE POWER says
WHAT A BEAUTIFUL CAKE WANT TO EAT IT NOW
Kristy Murray says
Awww. Thanks so much Freddie.
Eric says
This layered cake looks absolutely incredible! And I'm perfectly fine with a chocolate coma from it. As always thanks for sharing.
Kristy Murray says
Thanks for stopping by Eric. This cake definitely calls for a special occasion. It's as pretty as it is good.
Geri Berg says
Can you please modify the recipe for a 2 layer cake?
Kristy Murray says
Hi Geri. Thanks for stopping by. I've never made this as a 2 layer cake therefore I'm not sure the best way to cut back the measurements. If you are using 2 round cake pans the cake batter will remain the same although the raspberry filling, frosting and ganache will be too much. I wish I could give you a better answer.
Bonnie says
Could the measurements on the raspberry mixture possibly be wrong? I just mixed the slurry, and it became this weird semi-solid. I think I'm going to add more water.
Kristy Murray says
Hi Bonnie. The measurements are accurate for whenever I've made the cake but you can always add a little extra water or lemon juice to the slurry if it seems really thick and you are unable to get a good stir with it. I just got in my kitchen to make the slurry just to be sure for accuracy's sake and it stirred up just fine. Not sure why yours turned out as a "weird semi-solid." The extra liquid should help though. Thanks for asking.
Bonnie says
Kristy, Thanks for the quick reply and test! Later, I was thinking maybe it has to do with my living in MN where it is really cold right now and my house is really dry? I ende3d up adding about 3 tsps. I didn't make the whole cake, but the raspberry filling was wonderful in my son's birthday cake. Thank you for the recipe!
Kristy Murray says
I'm so happy that it all worked out for you Bonnie for the raspberry sauce and your son's cake. And BTW Happy Birthday to your Son. I appreciate you taking the time to leave comments. Hope you have a great weekend.
Naomi says
Fantastic cake- friends and family loved it. One possible error: in ingredients amount for chocolate frosting is says 1/2 cup of butter, but in instructions it says 1/3 cup. Which is correct? I used 1/3 cup and it worked fine. I also love how you list amounts in your instructions so I don’t have to constantly scroll up to see amounts. I will be using your site often for this reason alone!
Kristy Murray says
Hi Naomi. First of all thanks so much for pointing out the discrepancy found in the measurements. I originally used 1/2 cup of butter, so I changed that in the instructions. But it sounds like you had success with the 1/3 cup of butter. So I think either one would work. Also, thanks for your kind comments. I'm thrilled that your family and friends all loved the cake. It definitely is a winner with all those crazy layers. Also I do appreciate you noticing the amounts in the instructions. I have added those because I hate scrolling back and forth as well when I'm trying to follow a recipe.
MD says
About to make this cake for my daughter’s birthday. Is it possible to substitute some other liquid for the coffee? And, if not does the cake have a strong coffee flavor when baked? Thank you!
Kristy Murray says
Thanks for checking out this cake recipe. Coffee in the batter does not make it taste like coffee, it only enhances and deepens the rich chocolate flavor. Hope that helps. And Also, happy birthday to your daughter.
KJ says
I made this for a birthday and it definitely was a showstopper, got so many compliments. I will give some feedback though in case it helps others. I used frozen raspberries in the jam, and even when chilled it was a bit too runny, next time I would try to thicken this up more, as it definitely made the layers slide around. Also I found the choc to cream ratio in the ganache too thin to set nicely, so I added more chocolate. Great tasting cake though and will use again with these tweaks. Thanks Kristy!
Kristy Murray says
Thanks so much KJ for your suggestions.
Star Pullins says
Looking forward to making this!
Do you think you could use Raspberry Jam instead of the homemade sauce?
Thanks,
Star
Kristy Murray says
Thanks for stopping by. And yes, you could definitely use a raspberry jam instead. Hope you enjoy!
Eliza says
hi so i am about to make this cake and i was wondering if you use the ganache as the very outside frosting or just as a crumb coat
Kristy Murray says
Hi Eliza. So sorry for the delay in responding. I hope you ended up making this chocolate raspberry cake and you were able to figure out the answer to your question. Just to clarify, you do use the ganache for both the crumb barrier and the final frosting.
JJ says
The best cake! I have made it numerous times! I always get rave reviews!