
Cherry Cheesecake is a ridiculously decadent dessert with a layer of whipped cream filling atop a smooth and creamy cheesecake. It's crowned with a topping that's bursting with tart cherries. All of this rests on a buttery graham cracker crust. This made-from-scratch cherry cheesecake is a pure delight.

Ingredients for this Cherry Cheesecake Recipe
- Graham Crackers - crushed to make the crust
- Granulated Sugar - is found in all layers of this cheesecake, the crust, the fillings, and the cherry topping.
- Melted Butter - this helps bind the graham cracker crumbs
- Softened Cream Cheese - use full fat for the best result
- Sour Cream - brought to room temperature
- Vanilla Extract - grab the pure vanilla extract over the imitation one
- Lemon Juice - I chose freshly squeezed lemon juice over the bottled kind. Either one will work in this recipe.
- Cornstarch - a secret ingredient to help a cheesecake not crack and it gives a creamier texture. It is also used in the cherry topping to thicken it.
- Eggs - use large eggs that have come to room temperature. Eggs help thicken the filling to give it structure
- Frozen Whipped Topping - this is combined with softened cream cheese and sugar to create the whipped topping
- Frozen Tart Cherries - you can use any type of frozen cherry. I chose tart to balance out the sweetness of the fillings.
How to Make The Best Cherry Cheesecake
- Preparing the Graham Cracker Crust. Start with 12 full sheets of Graham Crackers which will be about 1 ½ cups of crumbs. You can either throw them in a heavy ziplock bag and use a rolling pin to crush them or use a food processor to grind the crackers. Combine the graham crackers with melted butter and sugar together. It should be a coarse, sandy texture.
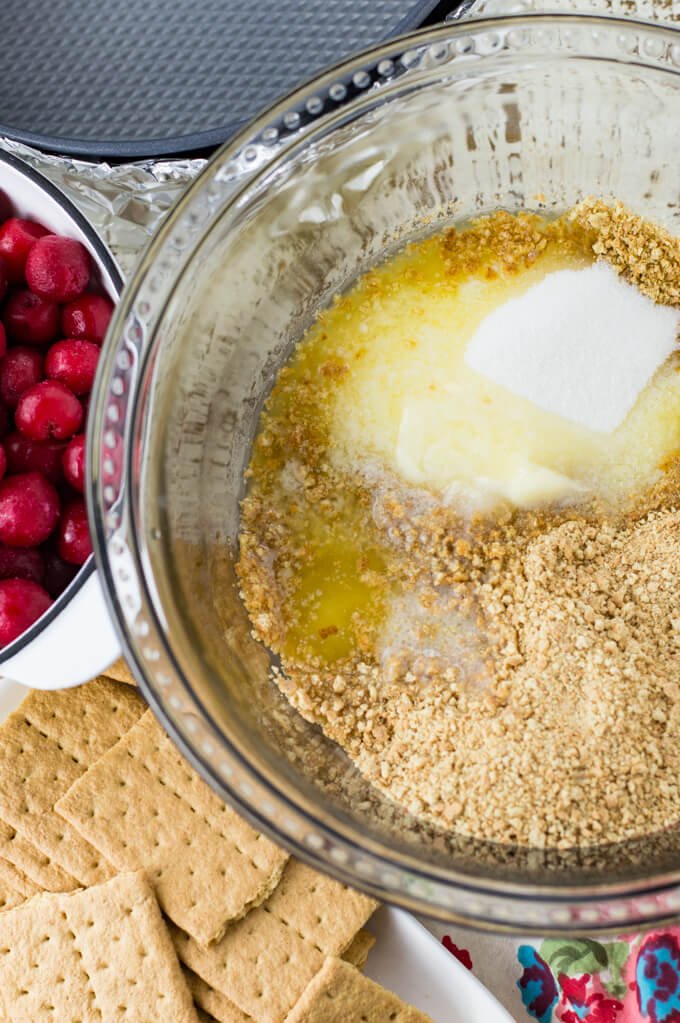
- Press the graham crackers into a springform pan. Even if you have a non-stick springform pan, I encourage you to grease it anyway. You can use your fingers to pack down the crust but I have found the best way is to use a flat-bottomed metal measuring cup to pack down the crumbs on the bottom ad sides of the pan until they are tightly compacted.

- Mix the cheesecake batter. Beat room-temperature cream cheese only until it's smooth and creamy. Add in the granulated sugar, sour cream, lemon juice, and cornstarch while scraping down the sides of the bowl. Lastly, add the eggs one at a time beating after each addition. Stop beating as soon as the second egg is incorporated.

- Prepare a water bath. This is a pan of water under the springform pan that creates steam and generates slow and even baking. One way to achieve this is to sit the springform pan in a larger round pan (12x3 inches). Then sit the larger pan in a large roasting pan and add water halfway up the outside round pan. This creates a barrier for the water not to seep in.

- The second way to prepare a water bath is to securely wrap the springform pan with two layers of heavy-duty aluminum foil. Place the pan on top of the foil, and wrap it up the sides to the top of the pan (see photo below).

- Bake the Cherry Cheesecake. Pour the cheesecake filling into the springform pan and bake for 60-70 minutes or until the cheesecake has a slight jiggle in the middle. Do not open the door until almost done.
- Cool the cheesecake. Tum the oven off, slightly crack the oven door and let it set in the oven for one hour. Remove the cheesecake carefully and place it on top of the oven (the warmest place in my kitchen) where it can continue to cool.
- Chill in the refrigerator. When it is completely cooled, you can then move it to the refrigerator to chill for a least 4 hours or overnight. This is the greatest and most tempting test of the recipe. Oh, the willpower to not dive directly into it.

- Prepare the whipped cream filling. Start with room-temperature cream cheese and beat until creamy and smooth. Add the granulated sugar and continue to beat. Fold in the thawed whipped cream and chill in the refrigerator.

- Spread the whipped topping on the chilled cheesecake. Place it back into the refrigerator until ready to top with the cherry filling.

- Thaw and drain the frozen cherries. Place the frozen tart cherries in a metal colander to drain and set them it in a bowl to hold the juice drippings. This can take a couple of hours for the cherries to both thaw and completely drain. You can defrost them in a microwave but make sure to drain the juice before preparing the filling.
- Make a slurry. Make a cornstarch slurry from the cherry juice, four tablespoons of cornstarch to ⅓ cup of reserved cherry juice. Whisk both of these together in a small bowl and set aside until ready to use.

- Make the cherry topping. Add the juice from the cherries, granulated sugar, and freshly squeezed lemon juice to a medium saucepan. Bring to a boil over medium-high heat and slowly pour in the cornstarch slurry while quickly whisking it into the cherry juice mixture. Cook for a minute or two until the juice thickens. Let cool completely.

- Layer the Cherry Cheesecake. Pull the Cherry Cheesecake out of the refrigerator. With a table knife, cut around the outer edge. Spoon the whipped cream on top of the cheesecake and spread it all around. Next, spread the chilled cherry topping over the second layer. Unlatch the round side panel and remove it from the cheesecake. At this point, you can either leave it on the metal bottom springform pan or gently remove it to a cake platter.
Pro Tips for making the Best Cherry Cheesecake Recipe
- Make sure the cream cheese, eggs, and sour cream are at room temperature before mixing. When these ingredients are warmer, they are easily blended together. Cold ingredients will leave you with a lumpy cheesecake filling.
- Don't overbeat the cheesecake filling. Overbeating can incorporate too much air causing the surface of the cheesecake to crack. Because this cheesecake has layers on top and covers up the actual cheesecake it is not as important. But it's good to know for future cheesecakes.
- Don't skip the water bath process. Cheesecakes love a humid environment. It reduces the problem of cracking that is found in so many cheesecakes. It also slowly lifts the cheesecake while baking and helps prevent it from sinking back down as it cools.
- Don't Open the door and peek while it's baking. Opening the door can cause your cheesecake to fall in the center or crack. It also lengthens the cooking time by letting heat escape.
- Cool the baked cheesecake in stages. A slow cool-down is essential when making this Cherry Cheesecake. Cheesecakes do not like sudden and drastic changes in temperature. You want to let it cool down as gradually as possible.
- Be careful not to overbake. Check the cheesecake for doneness with the "jiggle" test. Open the oven door and jiggle the pan ever so slightly. If the cheesecake wobbles just a little, it's ready If it ripples and is more of a sloshy jiggle, you need to leave it in the oven for a few more minutes. Make sure and pull it out before it fully sets.

Variations
Berry Toppings. You can use almost any frozen berry that you prefer for the topping. Strawberries, blueberries or blackberries are great. Raspberries will cook up too soft and mushy, so instead, I would probably top the cheesecake with raspberry jam and then add fresh raspberries.
Chocolate crust with chocolate crumbles on top. For this, I would use oreo cookies for both the crust and the crumbles on top.
Can you Freeze Cherry Cheesecake?
Cheesecake in general freezes great. My recommendation for this recipe is to place the springform pan with the baked cheesecake and the whipped filling in the freezer until completely frozen. Loosen and remove the sides and wrap the cheesecake with plastic wrap and then foil. Wait to make and add the cherry topping until you are ready to serve it. Cheesecake will last for a month in the freezer.

This is what I call blissful indulgence, a slice of heaven in your kitchen, and a sweet extravaganza. Can you tell I'm in love with this dessert? After one bite, I pretty much guarantee you will be too.
Other Desserts to Try
Layered Chocolate Raspberry Cake
Chocolate Peanut Butter Cupcakes
Follow me on Pinterest - Lingeralittle.
PrintCherry Cheesecake Recipe

A ridiculously decadent dessert with layers of smooth, creamy cheesecake, whipped cream middle, and a topping that's bursting with a homemade cherry filling. All of this rests on a buttery graham cracker crust. This melt-in-your-mouth cherry cheesecake is made from scratch and is a pure creamy delight.
- Prep Time: 30 minutes
- Cook Time: 60 minutes
- Total Time: 90 minutes (no including cooling and chilling time)
- Yield: 12 servings 1x
- Category: Baked Goods
- Method: Baked
- Cuisine: American
Ingredients
Graham Cracker Crust
- 12 Whole Sheets of Graham Cracker, 1 ½ cups crumbs
- ⅓ cup Granulated Sugar
- 6 tablespoons Melted Butter
Cheesecake Filling
- 3 - 8 ounces packages Cream Cheese (room temperature)
- ¾ cup Granulated Sugar
- ¾ cup Full-Fat Sour Cream (room temperature)
- 2 teaspoons Pure Vanilla
- 2 teaspoons Freshly Squeezed Lemon Juice
- 2 tablespoons Cornstarch
- 2 Large Eggs (room temperature)
Whipped Cream Filling
- 8 ounces Cream Cheese, softened to room temperature
- ½ cup Granulated Sugar
- 8 ounce package Frozen Whipped Topping, thawed
Homemade Tart Cherry Topping
- 2 - 12 ounce package Frozen Tart Cherries, thawed and drained
- Juice from the Cherries
- 3 tablespoons Cornstarch
- 1 cup Granulated Sugar
- 2 teaspoons Freshly Squeezed Lemon Juice
Instructions
Graham Cracker Crust
- Preheat the oven to 350°F.
- In a medium-size bowl, combine 1 ½ cups of graham cracker crumbs, ⅓ cup granulated sugar, and 6 tablespoons of melted butter.
- Grease a 10-inch springform pan and dump in the graham cracker mixture.
- Use your fingers to spread it around the bottom of the pan. Use a flat bottom measuring cup to press the crumbs into the pan going about halfway up the sides.
- Set aside.
Cheesecake Filling
- In a large mixing bowl, beat on medium-high speed 3 - 8 ounce packages of softened cream cheese and ¾ cup of granulated sugar only until combined and creamy.
- Reduce the speed to medium-low, and add in ¾ cups sour cream (room temperature), 2 teaspoons pure vanilla, 2 teaspoons of freshly squeezed lemon juice, and 2 tablespoons of cornstarch only until combined. Be careful not to overbeat. Scrape down the bowl with a rubber spatula while beating.
- Add 2 large eggs, one at a time, beating after each addition. Once the eggs have been added and incorporated, stop mixing.
- Pour the cheesecake filling into the springform pan.
- Place the springform pan into a larger round cake pan. Place both of these pans into a large roasting pan. (see notes below for an alternate water bath)
- Place the roasting pan in the oven and pour water halfway up the side of the larger round cake pan.
- Bake for 60-70 minutes or until the cheesecake slightly jiggles in the middle. Do not open the door until almost done.
- Turn the oven off and slightly crack the door and let the cheesecake sit in the oven for 1 hour while cooling.
- Remove the springform pan from the oven and set it on the countertop for a couple of hours to completely cool.
- Place the cooled cheesecake in the refrigerator for 4 hours or overnight to chill.
Mascarpone Whipped Cream Filling
- In a medium mixing bowl, beat 8 ounces of room-temperature cream cheese until creamy and smooth.
- Add the ½ cup granulated sugar and continue to beat.
- Beat in the thawed whipped cream until fully combined and fluffy.
- Chill in the refrigerator until ready to spread on the baked cheesecake batter.
Homemade Tart Cherry Topping
- Thaw and drain 2 - 12 ounce packages of frozen tart cherries. Reserve the juice.
- Make a cornstarch slurry by whisking together ⅓ cup of cherry juice and 4 tablespoons of cornstarch. Set aside.
- In a medium-sized saucepan heat the remaining cherry juice, 1 cup of sugar, 2 teaspoons of freshly squeezed lemon juice over medium-high heat until the sugar is dissolved and it begins to boil.
- Slowly pour the cornstarch slurry into the cherry mixture while quickly whisking.
- Return to a boil and reduce the heat to medium. Continue to slow boil until the cherry juice has thickened.
- Add in the cherries and gently stir. Continue to cook until the cherries are thickened to a spreadable consistency. Set aside to cool.
- Chill in the refrigerator.
Cherry Cheesecake
- Pull the chilled cheesecake from the refrigerator. Run a table knife around the edge.
- Spoon the mascarpone whipped cream filling onto the top of the cheesecake and spread all around.
- Spoon the cherry topping onto the whipped cream layer and spread it around.
- Unlock the side latch of the springform pan and remove the sides.
- Serve on the metal bottom plate or carefully remove and place on a cake platter.
- Slice and Serve.
- ENJOY!!
Notes
- Make sure the cream cheese, eggs, and sour cream are at room temperature before mixing. When these ingredients are warmer, they are easily blended together. Cold ingredients will leave you with a lumpy cheesecake filling.
- Don't overbeat the cheesecake batter. Overbeating can incorporate too much air causing the surface of the cheesecake to crack. Because this cheesecake has layers on top and covering up the actual cheesecake it is not as important. But it's good to know for future cheesecakes.
- There are two ways to prepare your springform pan for a water bath. The first one is my preferred one.
- #1 - Sit the springform pan in a larger round pan (12x3 inches). Then sit the larger pan in a large roasting pan and add water halfway up the outside round pan. Since there is no guarantee that a springform pan will seal off any water, this process provides a barrier between the two and ensures no-leak issues.
- #2 - Securely wrapped the springform pan with two layers of heavy-duty aluminum foil. Place the pan on top of the foil, and wrap it up the sides to the top of the pan.
- Don't Open the door and peek while it's baking. Opening the door can cause your cheesecake to fall in the center or crack. It also lengthens the cooking time by letting heat escape.
- Be careful not to overbake. You can see if your cheesecake is done with the "jiggle" test. Open the oven door and jiggle the pan ever so slightly. If the cheesecake wobbles just a little, you're good to go. If it ripples and is more of a sloshy jiggle, you need to leave it in the oven for a few more minutes. Make sure and pull it out before it fully sets.
- A slow cool-down is essential when making this Cherry Cheesecake. Cheesecakes do not like sudden and drastic changes in temperature. You want to let it cool down as gradually as possible.
Nutrition
- Serving Size: 1 slice
- Calories: 685
- Sugar: 64 g
- Sodium: 345 mg
- Fat: 40 g
- Saturated Fat: 24 g
- Unsaturated Fat: 9 g
- Trans Fat: 0 g
- Carbohydrates: 78 g
- Fiber: 1 g
- Protein: 7 g
- Cholesterol: 122 mg


Niki Medlin says
What a decadent dessert! The cheesecake looks so creamy. I especially like the whipped cream topping. I can’t wait to try it. Thanks for sharing, Kristy.
Kristy Murray says
Awww. Thanks so much Niki. It truly is decadent. So glad you stopped by and shared your comment.
Carrie Tyler says
Yup, total decadence! So many layers and flavors! Just in time for Easter too! Saving this one!!
Kristy Murray says
Thanks Carrie. This cheesecake can be really dangerous, lol, but oh so good! Happy Easter to you and your family.
Chefmimi says
Wow this is pretty. I’ve never thought about using frozen cherries. It must work really well or you wouldn’t use them! Saving this!
Kristy Murray says
Hi Mimi. Thanks. I use frozen cherries a lot especially when they are not season. So much more convenient. They honestly work great.
Eric says
This looks dangerously rich!
Kristy Murray says
Hi Eric. It is totally true. But oh soooo good!
Nat says
This looks delicious! I would like to make it for a birthday tomorrow. Can I put it all together today or should I keep all the layers separate and put it together tomorrow?
Kristy Murray says
Hi Nat. You definitely can make the whole thing together ahead of time. I’ve done that on a couple of occasions and it works great. You might want to leave it in the springform pan in the refrigerator and unlatch and plate it the day of. Enjoy!!
Nat says
Also- I only have a 9 inch spring foam pan. Can I use that instead of 10?
Kristy Murray says
Sorry for the delay Nat. You’ve probably already figured this out. But yea you can use a smaller pan but you may have extra filling left over. In the future you could make mini crustless cheesecakes with lined cupcake tins.
Keitina says
OMG! This cheesecake was amazing. I was leery of the whip cream and cream cheese topping but it was a perfect compliment. Thanks for sharing this amazing recipe.
Kristy Murray says
Thank you Keitina. I'm so thrilled that you liked this cheesecake. It is pretty decadent and I do have to say that it is one of my favorites. You are so kind for taking the time to share your thoughts.
David @ Spiced says
I'm pretty sure you landed on one of my all-time favorites right here, Kristy! I didn't eat cheesecakes as a kid (I thought the concept of cheese in a cake sounded terrible), but I'm certainly making up for lost time as an adult. The cherry topping on this looks like something right out of a magazine!!
Valentina says
This is a gorgeous cheesecake! I love the layer of whipped cream with the cherries spilling over it. I've been making a lot of cheesecake lately and can't seem to stop craving them. Perfect timing! 🙂 ~Valentina
Kristy Murray says
Thanks Valentina. It's so nice of you to stop by and leave a comment. I've been craving different cheesecakes as well lately. It must be the season, haha.
Neil says
As a lover of cheesecakes I have to say this one would be hard to beat. All those delicious cherry flavours. Woah! I'm drooling here.
Kristy Murray says
Thanks so much Neil.
David @ Spiced says
You know what's funny? Laura and I were just talking about making a cheesecake with cherry topping for Thanksgiving. It's my mother-in-law's favorite! And then I pop over and see this recipe again. Love it!! It's not even 8am yet, and you've got me craving cheesecake...haha.
Kristy Murray says
Thanks David. I'm with you in that I could eat cheesecake any time of the day. haha
Patty C. says
I've made this cheesecake twice and now have another request for one. It is fabulous! Eceryone loved it!
kelly says
I just made this. I wanted a cheesecake with something extra for a dinner I am attending. The flavor combination of this recipe is awesome. This is a keeper. I agree, this is the "Best Cherry Cheesecake"!