
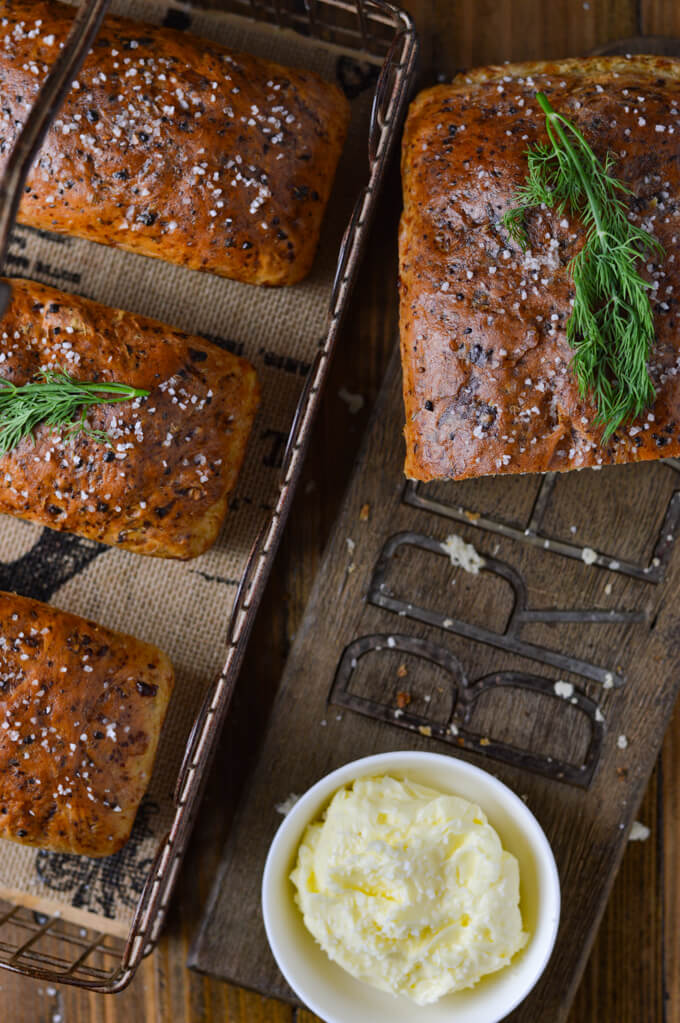
Gorgeous golden brown loaves of old-fashioned dill bread served piping hot out of the oven, smothered with butter and sprinkled with coarse sea salt. An ultimate temptation that fills the house with aromas of dill seed and minced onions and is hard to resist.
I've recently spent some time returning to my cooking roots, where tried and true family treasures hide. This has me reminiscing of days gone by. I have family recipes galore in an old Hallmark recipe organizer. Here handwritten directions are found on the side columns, newspaper clippings from the "Food" section are tucked away in the back, and scribbles of ingredients on scraps of paper stuck between yellowed dog-eared pages. The splattering of every food item imaginable has diminished the outer beauty of this book. But the precious memories it holds in its interior grips my heart every time I revisit it.
This Old Fashioned Dill Bread recipe lies somewhere in that ragged recipe organizer between Divinity Candy and Raised Donuts. The last time I made this bread was a couple of years ago when I gave them as gifts in a basket with lots of other goodies. I opened the organizer a few weeks back, and this recipe caught my eye again. So, here, I share this time-tested family recipe with you to indulge and enjoy.
Family bread recipes tend to bring me comfort and a sense of nostalgia when they're baking in my kitchen. Some of my favorites are Sweet Cornbread, Homemade Dinner Rolls, and Old-Fashioned Banana Bread. All of these seem to bring calmness and serenity to my heart.
Why I love this Old Fashioned Dill Bread Recipe:
This bread is infused with flavors of dill and onion. It's amazing how a smidgen of dill seed and a little bit of minced dried onions can permeate an entire loaf of bread.
I love the soft and spongy texture it produces at its center. Crusty, crunchy bread is awesome, but sometimes I want a dense pillowy effect when I'm biting into a slice of bread. That's exactly what you get with this recipe.
It's a very easy yeast bread recipe - there's no kneading involved. Although a package of active dry yeast is used, there's no elbow grease of pushing and pressing to get the dough perfectly kneaded. Mix it until it's combined and let it rise a couple of times. That's it.

Yeast is What Gives "Rise" to this Old Fashioned Dill Bread
The number one ingredient that gives "rise" to this loaf is the package of active dry yeast that has first of all been proofed. What does that mean? You want to make sure the yeast in your cabinet is still alive. In this recipe, dissolve the yeast and ½ teaspoon sugar in ¼ cup of "warm to the touch" water (between 105-115°F).
Watching to see if the yeast foams up
Place the yeast mixture in a warm area (microwave works great) and let it sit for about 10 minutes or until the foam on top has doubled in size. If the yeast does not rise, it’s because the water was too hot or the yeast is old. If that’s the case, you will need to start over. This is an indication that your bread will not rise either.
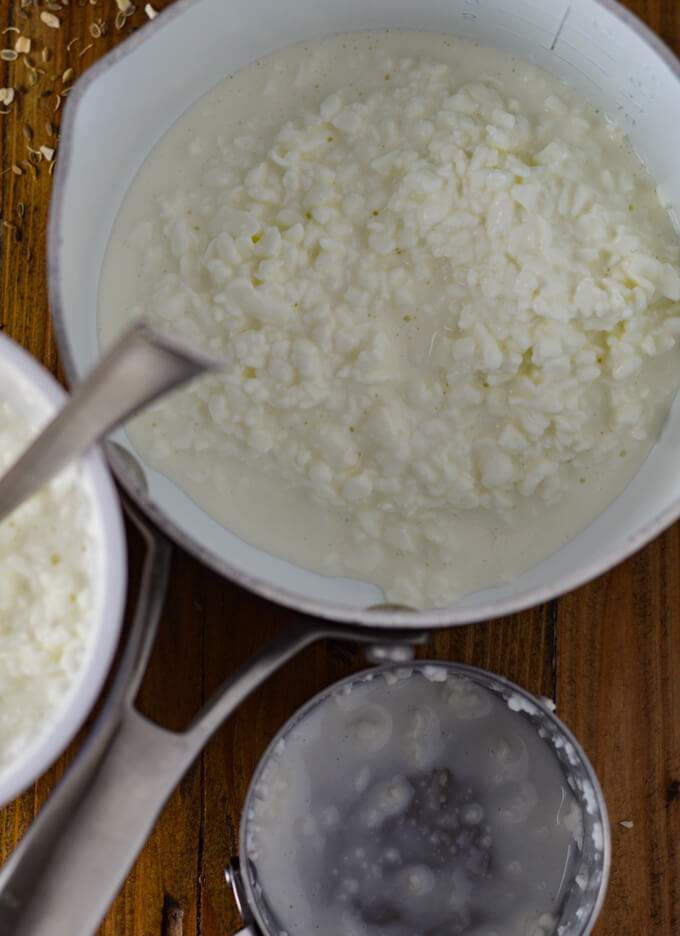
Warming the Cottage Cheese
Adding cottage cheese to this recipe produces a soft and moist crumb. Warm the cottage cheese before adding all the other ingredients. I'm not sure why the warming is called for, but I've always done it that way because my mom always did it that way and others before her. I just blindly follow but the results have always been great.

No Kneading Required!
All the ingredients are then added to a large bowl and mixed together just until combined. The beauty of this recipe - "no kneading" required! Now that's what I call the ultimate bread-making recipe. Throw everything in together, mix it up and let it rise. It doesn't get any easier than that, my friends.

Time to Rest, Time to Rise
Dilly Bread dough should rise twice. The first time in a buttered bowl set in a warm place (like a microwave), with a dishtowel placed over it. Let the dough sit for about one hour or until it doubles in size. The second time shaped into loaves and placed into the pans and back into a warm area covered with a dishtowel.
Fermentation takes place during this process. You don't want the dough to rise beyond double because it stretches the gluten too much and will cause the end product to be tough.
How to tell if the Dough has Risen Enough
How can you tell if your dough has risen to its proper stage? Use the tip of your finger and make an indentation around the outside of the dough. If it bounces back about halfway, you know your dough is ready either to punch down and rise again to go into the oven for the final step. If it doesn't bounce back, it has risen too long. If it completely bounces back, you can be sure it's not fully risen.
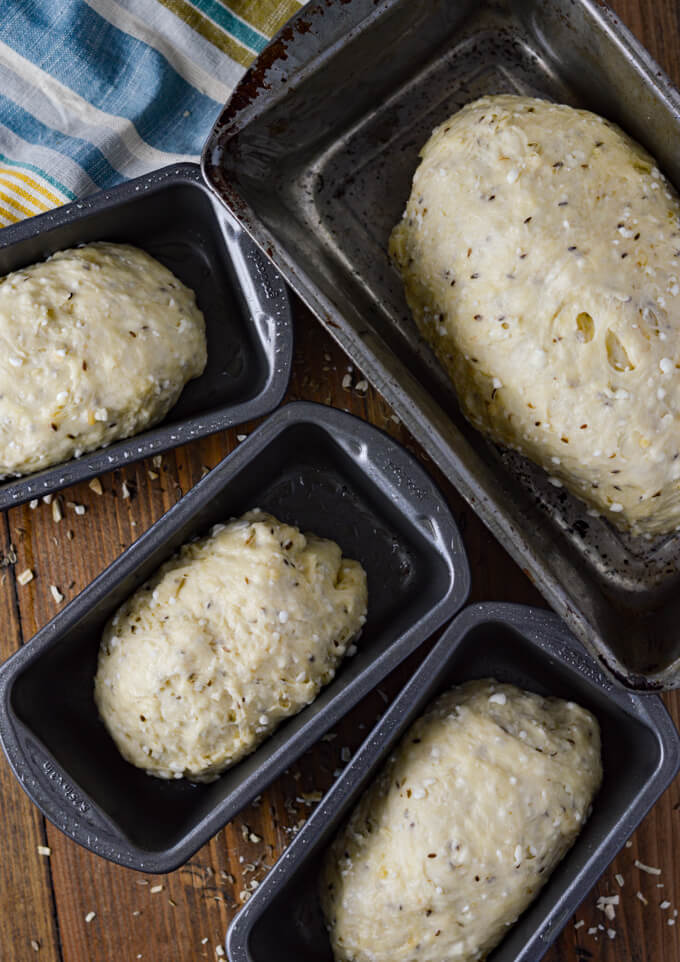
Shape the Dough into Loaves
The second rise comes after shaping the dough into loaves and placing them in greased baking pans. I doubled this recipe and it gave me one regular loaf pan and three mini loaf pans. Like the first rise, cover it with a dishtowel and place the loaf pans in a warm place and let them rise for another hour or until the dough again has doubled in size.
I'm sorry that there is no photo of the risen bread dough in the loaf pans. While photographing the batch, my reflection board toppled over and smashed every loaf. It could've been such a cool shot. Oh well, it happens (more often than I would like to admit.)
Baking the Dill Bread
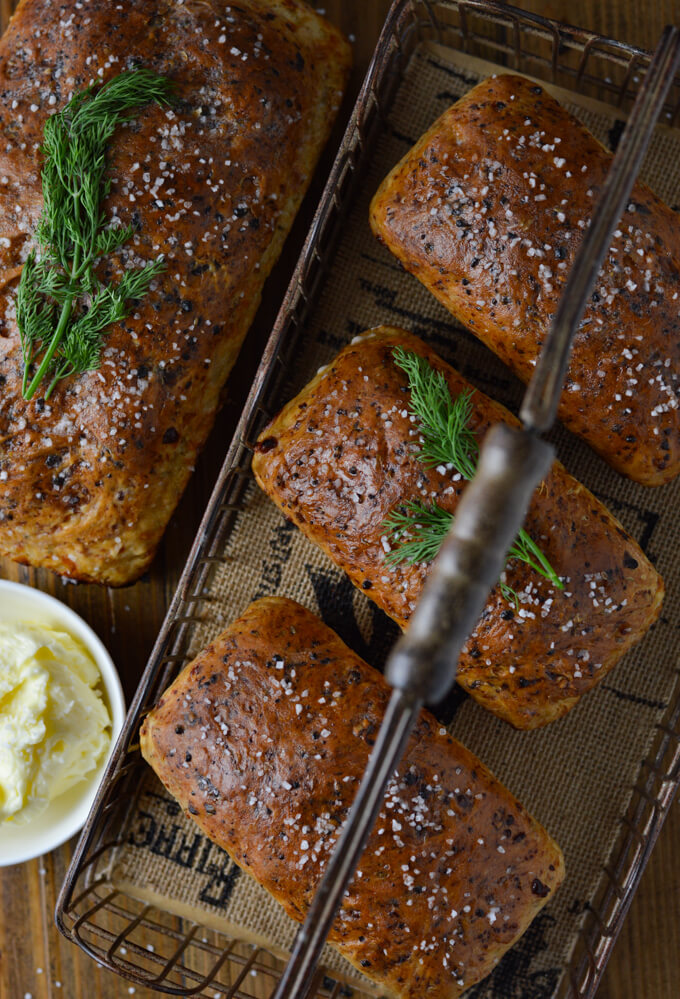
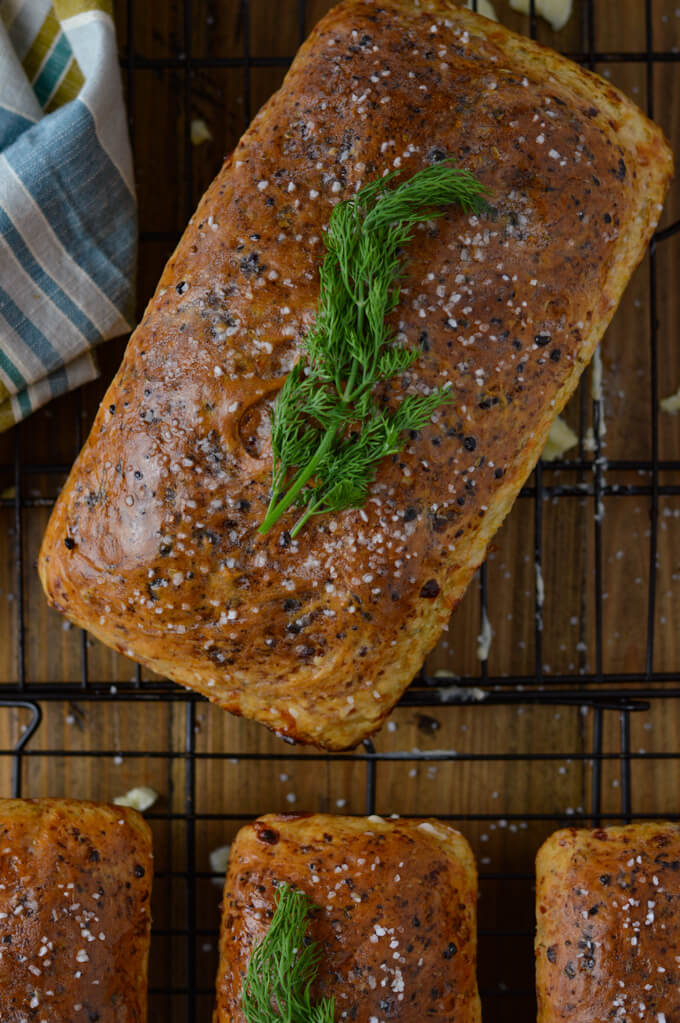
The temperature I bake these little beauties at is 350°F. The regular size loaf pan took anywhere from 40-45 minutes which, as you can see from the photo above, turned out stunningly rich in golden brown tones. The mini loaf pans came out of the oven in about 25-30 minutes. Don't take them out before you have this luscious gold hue.
Nobody Likes Soggy Bread
Don't let the baked loaves sit any longer than five minutes in the pan, otherwise, they sweat and produce condensation. And who wants soggy bread? Gently remove the bread from the loaf pans and place them on a wire cooling rack.
Immediately while the bread is still warm, slather it with butter on the top and sides. This gives the bread a beautiful glossy appearance. The final step is to sprinkle the tops of the loaves with coarse sea salt. Well, actually the final step is slicing and devouring.

Overwhelm your Senses
From the beauty of the loaf itself to the whiff of yeast, onion, and dill, to the explosion on your taste buds, your senses will be overwhelmed with pure pleasure. The satisfaction this Old Fashioned Dill Bread gives is so delightful, that I promise you'll return to slice another piece and slather it with butter time and again. It's really hard to restrain myself while this dilly bread is sitting there staring at me from the counter and calling my name. But of course, I do need to work on my discipline. Well, I think I'll work on that tomorrow. Yep, tomorrow is good.
If you love this Dill Bread Recipe, you will also love my
Homemade Bread Roll Recipe
Sweet Cornbread Recipe
Homemade Pizza Dough
Please consider following me on Pinterest - Lingeralitte
PrintGrandma's Old Fashioned Dill Bread

Gorgeous golden brown loaves of old fashioned dill bread served piping hot out of the oven, smothered with butter and sprinkled with coarse sea salt. An ultimate temptation that fills the house with aromas of dill seed and minced onions and is extremely hard to resist.
- Prep Time: 12 minutes
- Cook Time: 40-45 minutes
- Total Time: 55 minutes (not including rise time)
- Yield: 1 Regular Loaf 1x
- Category: Bread
- Method: Baking
- Cuisine: American
Ingredients
- 1 package Active Dry Yeast
- ½ teaspoon Sugar
- ¼ cup warm Water
- 1 cup small curd Cottage Cheese
- 2 tablespoons Sugar
- 1 tablespoon melted Butter
- 1 tablespoon Minced Dried Onions
- 2 teaspoons dried Dill Seed
- 1 teaspoon Salt
- ¼ teaspoon Baking Soda
- 1 Egg, beaten
- 2 ¼ cups All-Purpose Flour
- Butter, for brushing on baked loaves
- Coarse Sea Salt, for sprinkling
Instructions
- Dissolve yeast and sugar in the warm water. Let it sit for 10 minutes until the foam on top is doubled in size.
- Heat the cottage cheese in a small pan to lukewarm.
- Combine the cottage cheese and the yeast mixture together.
- Add the remaining ingredients until combined.
- Butter a large bowl and place the dill bread dough. Roll the dough around the bowl to butter it.
- Place a dish towel over the bowl and set it in a warm place (microwave works great). Let the dough rise for about one hour or until it is doubled in size.
- Press the dough down and shape it into either one regular loaf size or three mini loaves.
- Place the shaped dough into the loaf pan(s). And again set them in a warm place, cover them with a dish towel and let them rise for another hour or until doubled in size.
- While the dough is rising for the second time preheat the oven to 350°F.
- Bake the regular sized loaf for 40-45 minutes or until golden brown. Bake the mini loaves for 25-30 minutes.
- Take out of the oven and let sit for no longer than 5 minutes in the pan(s). Remove the bread from the pan(s) and set them on a wire cooling rack.
- Brush lots of butter on the top and sides of the loaves. Sprinkle with coarse sea salt.
- ENJOY!
Notes
- Place the yeast mixture in a warm place (microwave works great) and let it sit for about 10 minutes or until the foam on top has doubled in size.
- If the yeast does not rise, it’s because the water was too hot or the yeast is old. If that’s the case, you will need to start over with new yeast.
- You don't want the dough to rise beyond double because it stretches the gluten too much and will cause the end product to be tough.
- How can you tell if your dough has risen to its proper stage? Use the tip of your finger and make an indentation around the outside of the dough. If it bounces back about halfway, you know your dough is ready.
- Don't let the baked loaves sit any longer than five minutes in the pan, otherwise, they sweat and produce condensation.
Nutrition
- Serving Size: ⅙th of Regular Loaf
- Calories: 189
- Sugar: 5 g
- Sodium: 462 mg
- Fat: 4 g
- Saturated Fat: 2 g
- Unsaturated Fat: 1 g
- Trans Fat: 0 g
- Carbohydrates: 30 g
- Fiber: 1 g
- Protein: 7 g
- Cholesterol: 33 mg


Eric says
Love the taste of dill and onion together. What a great bread recipe. Thanks for sharing.
Kristy Murray says
Thanks Eric. I so agree about the flavors of dill and onion. Glad you like the recipe.
Kristy Murray says
Thanks Eric. I agree the dill and onion are a GREAT combination. Thanks for stopping by.
Niki says
Your pictures are beautiful! I can practically smell the bread baking through my computer.
Carrie Tyler says
I’m inspired! First, thank you for sharing the memories and meaning behind this nd other recipes, Kristy! Second...YUM! This sounds and looks incredible! I am now inspired to make bread! I love the addition of dill and onion in this and cannot wait to try it!
Kristy Murray says
Thanks so much Carrie! I do think you will love this bread if you try it. And if you do, please let me know what you think. I so appreciate you stopping by and commenting on this post.
Billy says
Such a great recipe, cannot wait to try this at home!
Kristy Murray says
Thanks so much Billy for stopping by my site and leaving a comment. Would love to know what you think if you make this recipe.
Melissa says
I made this bread the other day and it was yummy!! Only difference was I used less dill seed and put in some dill I had frozen that I grew last summer. The dill was no overpowering. The bread itself is more like the consistency of banana bread, but it was really good! Planning on making it again soon.
Kristy Murray says
Hi Melissa. Thanks so much for taking the time to leave a comment. I'm really happy that you liked the recipe so much that you are going to make it again. I do love the idea that you used some of the frozen dill that you grew last summer. What a great idea. Enjoy the second batch!
Melanie says
I made this bread last night! I followed the recipe exactly as written (and with the help of the notes...it didn’t take the full hour for the dough to double in size either time). And the bread turned out AMAZING! It was delicious and the texture was perfect. Such an easy recipe too! (This was my first time making homemade bread!) Thank you for this recipe! I will definitely make it again!
Kristy Murray says
Hi Melanie! I'm so happy that you enjoyed my Old Fashioned Dill Bread. It is one of my favorite breads and I do agree that it is so easy to make. And thanks so much for taking the time to leave a comment. I'm so thrilled you are planning on making it again. Stay safe and healthy during this time.
Katherine says
Made this bread a week or so ago and it was great! Used the bread to make grilled cheese with pickles and served it with a Polish Dill Pickle Soup. Divine!! I'm making the bread again today but I'm using different flavors, maybe garlic and Italian seasoning. That'll go perfect with some tomato soup! Thanks you for the versatile and easy recipe!!
Kristy Murray says
Hi Katherine - thanks so much for taking the time to leave a comment. I absolutely love the idea of using the dill bread to make grilled cheese sandwiches with pickles. That's just brilliant. And your Polish Dill Pickle Soup sounds fabulous. What great ideas for using the recipe in such diverse ways.
Shiana says
I see sugar is listed twice in the recipe. Does that much sugar ever make the bread a little sweet?
Kristy Murray says
Hi Shiana, thanks for checking about the sugar. The two listings are correct. The 1/2 teaspoon of sugar is added to yeast in order to help activate it. And the remaining 2 tablespoons are added along with the other ingredients but are very subtle and you really don't even notice it when you taste the bread. If you end up making the bread, please let me know what you think.
Sherry Boswell Hansell says
I lost my "diily bread" recipe that I had for over 30 years. It called for fresh chopped onions, dill seed and dill weed. Do you think I could make these changes and still have the bread turn out using your recipe? Thank You
Kristy Murray says
Hi Sherry. It is possible that those changes could work. I've never tried any of those in this recipe though. I would love to know how it turns out if you do. Thanks for stopping by.
Kathy says
I used fresh onion cooked in bacon and only dill seed. It was what I used with a different dill bread recipe (which also called for large curd cottage cheese). It was AMAZING. So good my neighbor ate his loaf at one sitting! This is an easy family favorite. Thanks
Michelle says
Oh my my! Made this and served it toasted with cream cheese and a bowl of creamy carrot soup! Heaven!
Kristy Murray says
Hi Michelle. That sounds fabulous! What a great idea to serve it with. You have my mouth watering now. Thanks so much for sharing.
Joy Appleseth says
This is the exact same recipe my family has been using for years except for we add one tablespoon of minced garlic this has been my favorite bread all my life it is so good when it is hot and toasted with butter on it. You can also use soured cottage cheese that has gone bad instead of heating good cottage cheese that's the way we were taught. I have also used whole wheat flour instead of regular flour it made it a little more dense but even more healthy.
Kristy Murray says
Hi Joy. Thanks so much for stopping by and taking the time to comment. Don't you just love recipes that have been around for generations? I love all the variations you included. I greatly appreciate you sharing other ideas.
Neta says
Seems like the dough is hard to roll in butter in the bowl the first time
Kristy Murray says
Hi Neta. The Dill Bread dough is definitely denser than regular bread dough. If you're having a hard time rolling it in the bowl, I would just smear butter all around the bread with your hands.
Reginald says
Grandma's Dill Dough was perfect. It made such a scrumptious treat!
Kristy Murray says
Oh, I'm so glad Reginald. It is one of my favorite recipes. Thanks for taking the time to stop by and comment.
Adrienne says
I made this exactly as above and it was DELISH! My only question is: Can I freeze the dough? I'd love to make this as Christmas presents, but I feel like my family needs to small it being baked in their house! Please advise.
Thanks!
Adrienne says
Sorry... Typo. "Smell" the dough, not "small" it, lol!
Kristy Murray says
Hi Adrienne. I've not ever frozen this Dill Bread dough, but it would be like any other yeast dough. The answer to your question is yes. Double the yeast amount to compensate for the yeast that will die off in the freezing process. After the first rise, punch it down and shape it into loaves. Place the dough in loaf pans and freeze for about 10 hours. Place the frozen loaves in plastic wrap. These can be frozen for up to 4 months. When ready to bake, let the loaves unthaw overnight in the refrigerator. Place in pans, let rise a second time, and bake as normal. Such a great idea to give for gifts. Good luck.
Tori says
Hey is there anyway I could make this in a bread machine?
Kristy Murray says
Hi Tori. I have never made this in a bread machine but I don't see why it would not work. If you try it, please let me know how it comes out.
Cindy says
Love this recipe. Just like the bread my mother made. Can you double it to make two regular sized loaves?
Kristy Murray says
Hi Cindy. Thanks for stopping by and I'm so glad you love this recipe. And yes you can double all the ingredients in the recipe and your loaves should turn out fine. I would love your feedback if you do.
Catherine S says
My aunt made this as Christmas presents this year. I asked her for the recipe... she sent me a photo out of her cookbook and it is exactly the same ingredients and amounts as this recipe. Thank you for sharing the details and tips on how to tell if it has risen. I’m going to make it as dinner rolls to go with some smoked red fish. Hoping I can find some yeast!
Kristy Murray says
Catherine - thanks so much for stopping by and leaving a comment. I love the idea of making these as dinner rolls. And smoked red fish, Mmmmm!! Now that sounds fantastic. Enjoy. Let me know how they turn out.
Catherine S. - Weatherford Tx says
I made this into clover dinner rolls. They are amazing! How can I submit photos?
Kristy Murray says
Oh Catherine - I'm so glad you really liked the rolls. And clover dinner rolls would be perfect with this dough. I wish so much you could post your photos here on this site. It doesn't allow for that. I do have a Pinterest account that you could post the photos for this recipe though - https://www.pinterest.com/pin/738801513868740907/. I would love to see them.
Catherine S - Weatherford Tx says
Thank you! I really appreciated the detailed instructions on how to check if ready during rising process. I posted a photo of the rolls on the Pinterest page with this recipe.
Kristy Murray says
That's so great Catherine. Thanks a million for sharing!
Dee says
I love how easy this recipe is! I was all set to make the Dilly Bread when I found out I didn't have any minced dried onions so added 1/2 T dried chives and 1/2 T dried shallot instead. The bread is so flavorful, moist and delicious we can't stop eating it! So happy I came across your site, thank you.
Kristy Murray says
Hi Dee. I'm so happy the Dill Bread turned out so well for you. It really is a tried and true recipe with a lot of flavors. Sounds like the chives and shallots worked great. Thanks so much for stopping by and taking the time to leave a comment.
David @ Spiced says
What an absolutely gorgeous loaf of bread! I love the golden brown color, and I can practically smell this one baking in my oven. There is such an allure to going back to the old family recipes. Every so often I pull out my binder of old family recipes and it's like taking a trip down memory lane. I'm so grateful you shared this recipe, and I'm putting it on the list of things to bake once we finally settle into the new house!!
Suzan says
Could I make this an over-night bread by mixing in the evening and letting it rise the first time, then refrigerating over-night and baking in the morning, after the second rise?
Kristy Murray says
Hi Suzan. Yes you can prepare this bread the night before. Just make sure you give it plenty of time to rise the second time. Enjoy!
Jessica says
We have a ton of dill seeds on hand and I’d love to try to make this bread. However, I’m allergic to cow’s milk:( Can you think of anything that might work as a substitute for the cottage cheese? I was thinking almond milk or a plant-based yogurt, but I’m worried that would be too much liquid. Thanks!
Kristy Murray says
Hi Jessica. Thanks so much for stopping by and asking about a substitute for cottage cheese. There is a brand named Miyoko’s Creamery that makes dairy-free cottage cheese. Whole foods carry this brand. I'm not sure if they carry cottage cheese, but it would be a great place to start looking. Good luck.
Susan says
I made the x3 recipe a couple weeks ago and gave 2 loafs away. One to a friend and one to an outdoor stand owner that I use for a taste tester. He came out to greet me today to day it was his favorite of the three I have given him so far. Other was a Tuscan herb and one a tarragon. I had never heard of dill or using cottage cheese. They were such a hit I must make again. I also added 1 teas onion powder, 2 Tab dill weed, 2 tea garlic powder and 2Tab. parsley. I'm 74 and baked plain white for 56 years. Now a hit with flavor yeast bread. Hope others try .
Kristy Murray says
Thanks so much Susan! I’m so thrilled the dill bread was such a hit.
Kara says
My yeast bubbled like it was supposed to but my dough didn't rise, what would I have done wrong?
Kristy Murray says
Hi Kara. I'm so sorry to hear that your bread didn't rise properly. I've made this load so many times and it always rose like it was suppose to. My only thought is this, if the cottage cheese was heated too hot, it could kill the yeast. It should only be lukewarm when adding it to the yeast mixture.
donna white says
I'm in upstate NY. Back when I was a yougin', I'm 69 now, my Mother would bring home Dutch Dill Bread from our local grocer.I have Not had any since then. I don't know who the distributor was at that time. But I can Not find it any where up here. I found your recipe so I'm going to give it a try...Glad I found this. Now that I have the time, gonna give it a shot. I'll let you know. Thanx..
Sharon says
Do you butter the bread loafbefore you put the dough in the pan?
Kristy Murray says
Hi Sharon. Sorry for the delay in responding. But yes you do butter the pan before you put the dough in it.
sharon gavlovsky says
I have made it 3 times..I love it
Chip Murray says
Sounded really yummy so I gave it a try. My dough was probably a tad bit on the wet side. I reside in Mexico and all AP flour types are not the same. Over all I'm super impressed. Since my dough was on the wet side my loaf still crowned slightly but it also spread a little too. That does not affect the deliciousness of the loaf. It's soft and moist making it delicious! I'll be giving it another try and making sure my dough is a little but dryer the next time. Excellent!
I don't see the ability to upload my photos.
Chip Murray says
I made this using my fresh dill from the garden. I fond it surprisingly delicious and I was delighted by the fresh light taste. I will admit that the addition of cottage cheese was odd but it works beautifully and you'd really never know it was in if if you did not make it. I do think it added a bit of richness to the bread. It pared well with a gourmet soup and salad. I would make this again in my rotation of breads. .
Dace says
Easy to make and delicious!